3D printing glass and bronze: Lost-PLA casting
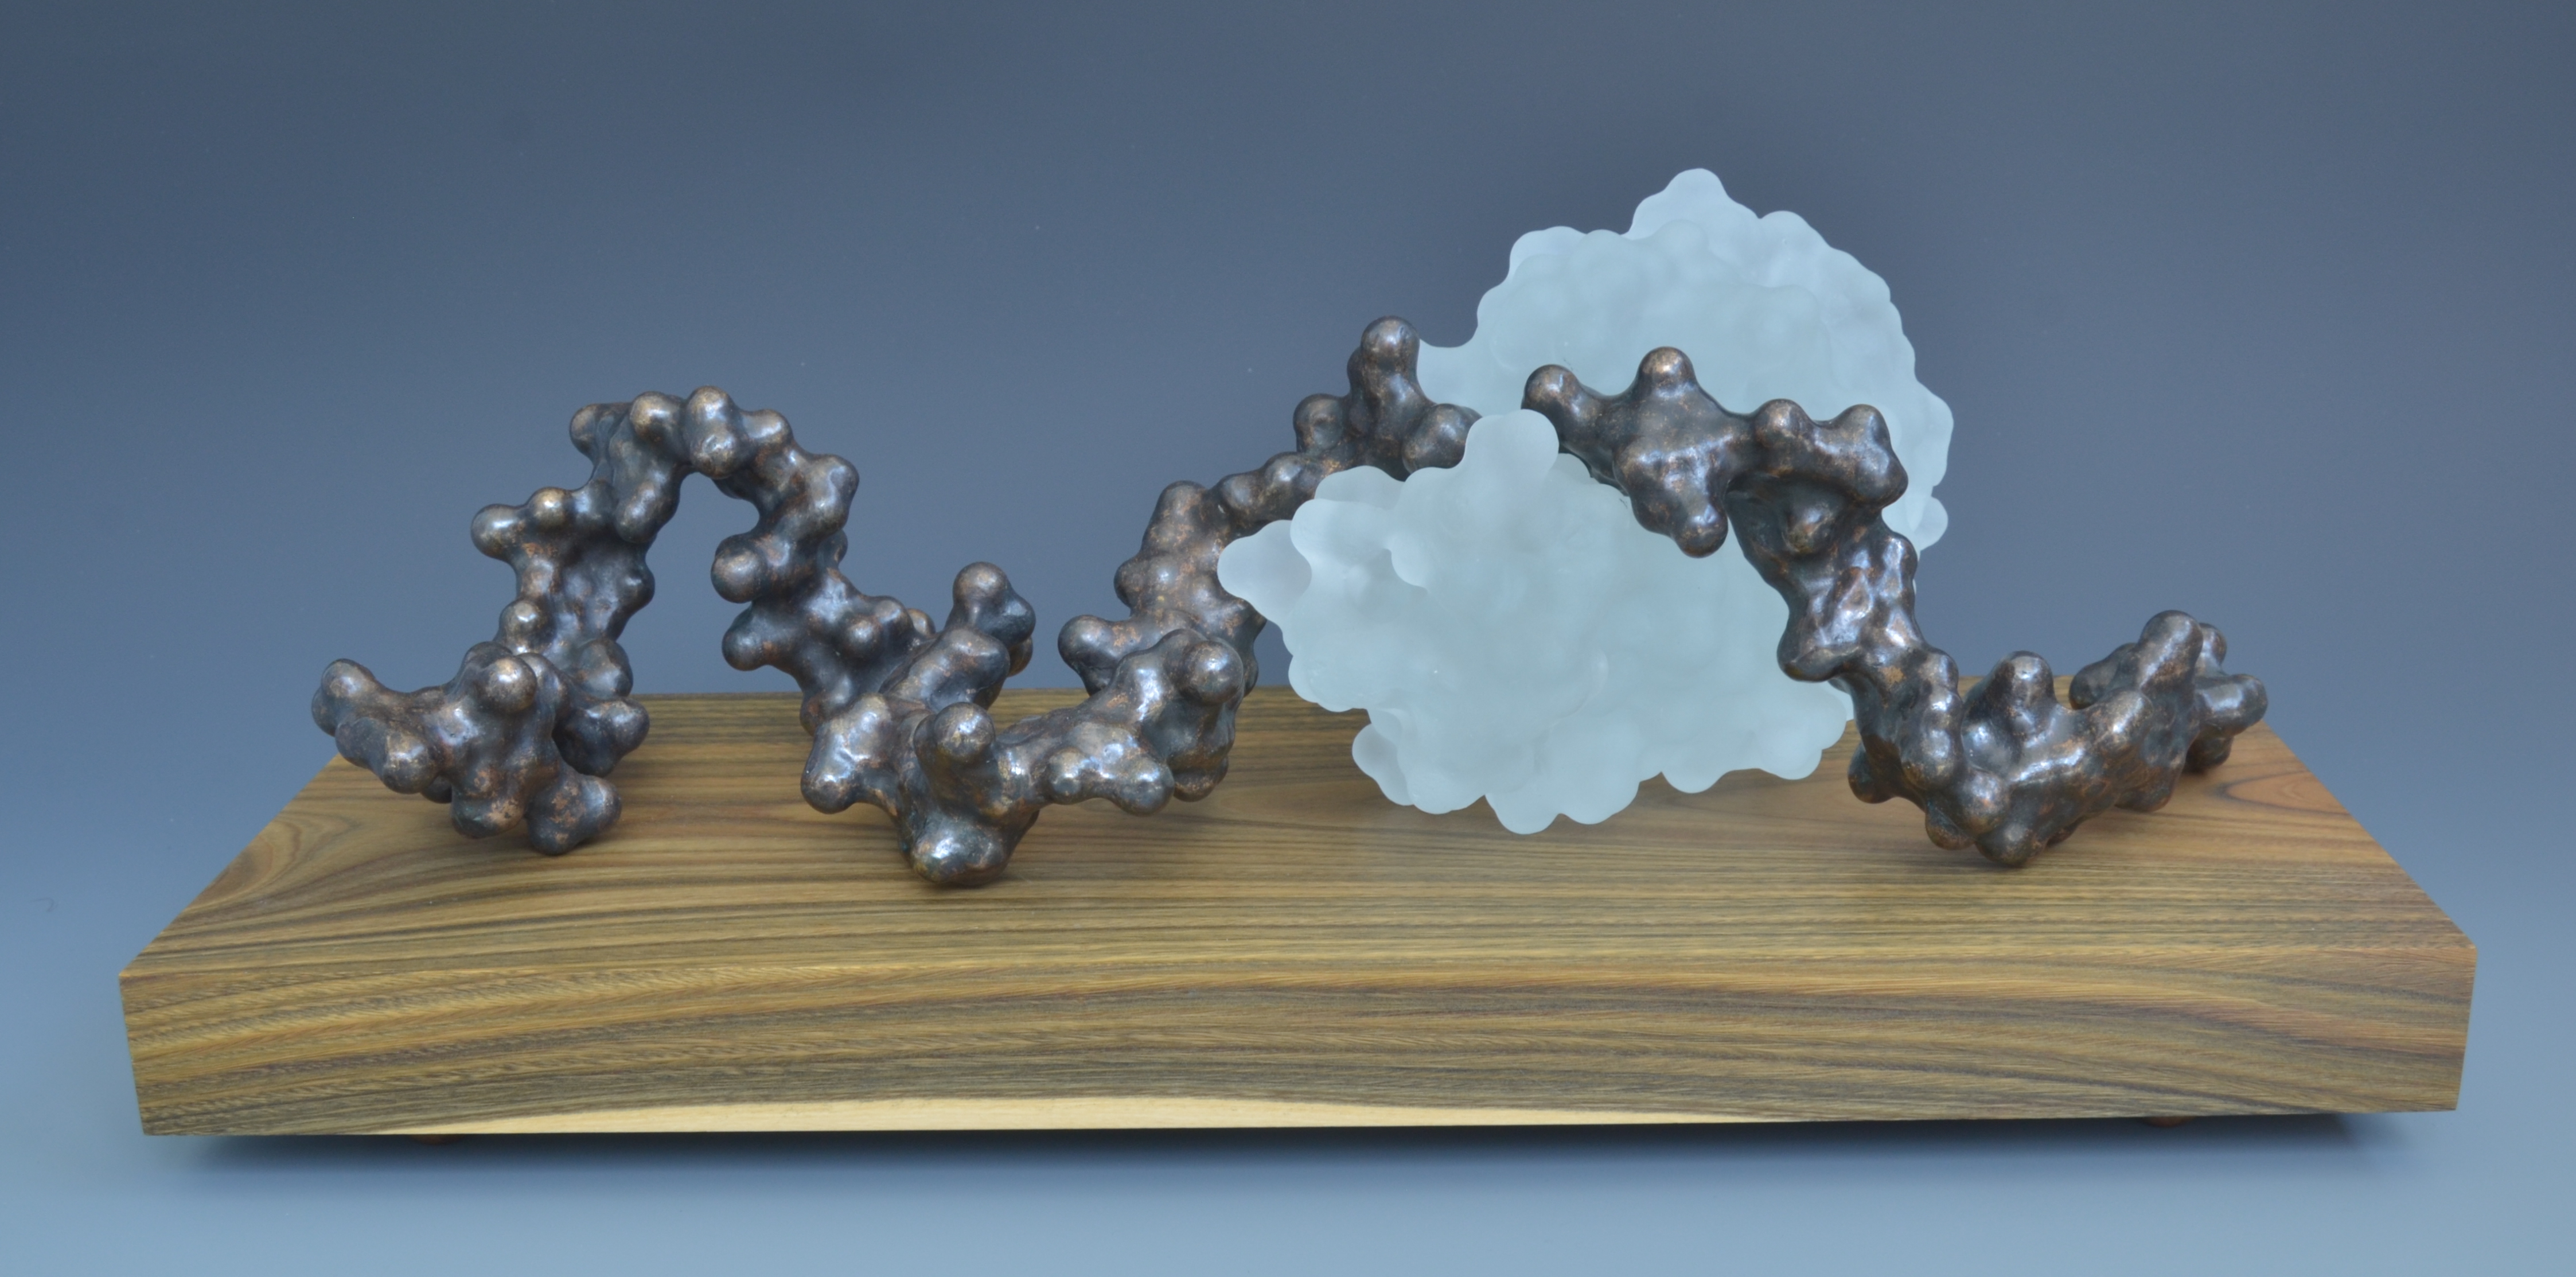
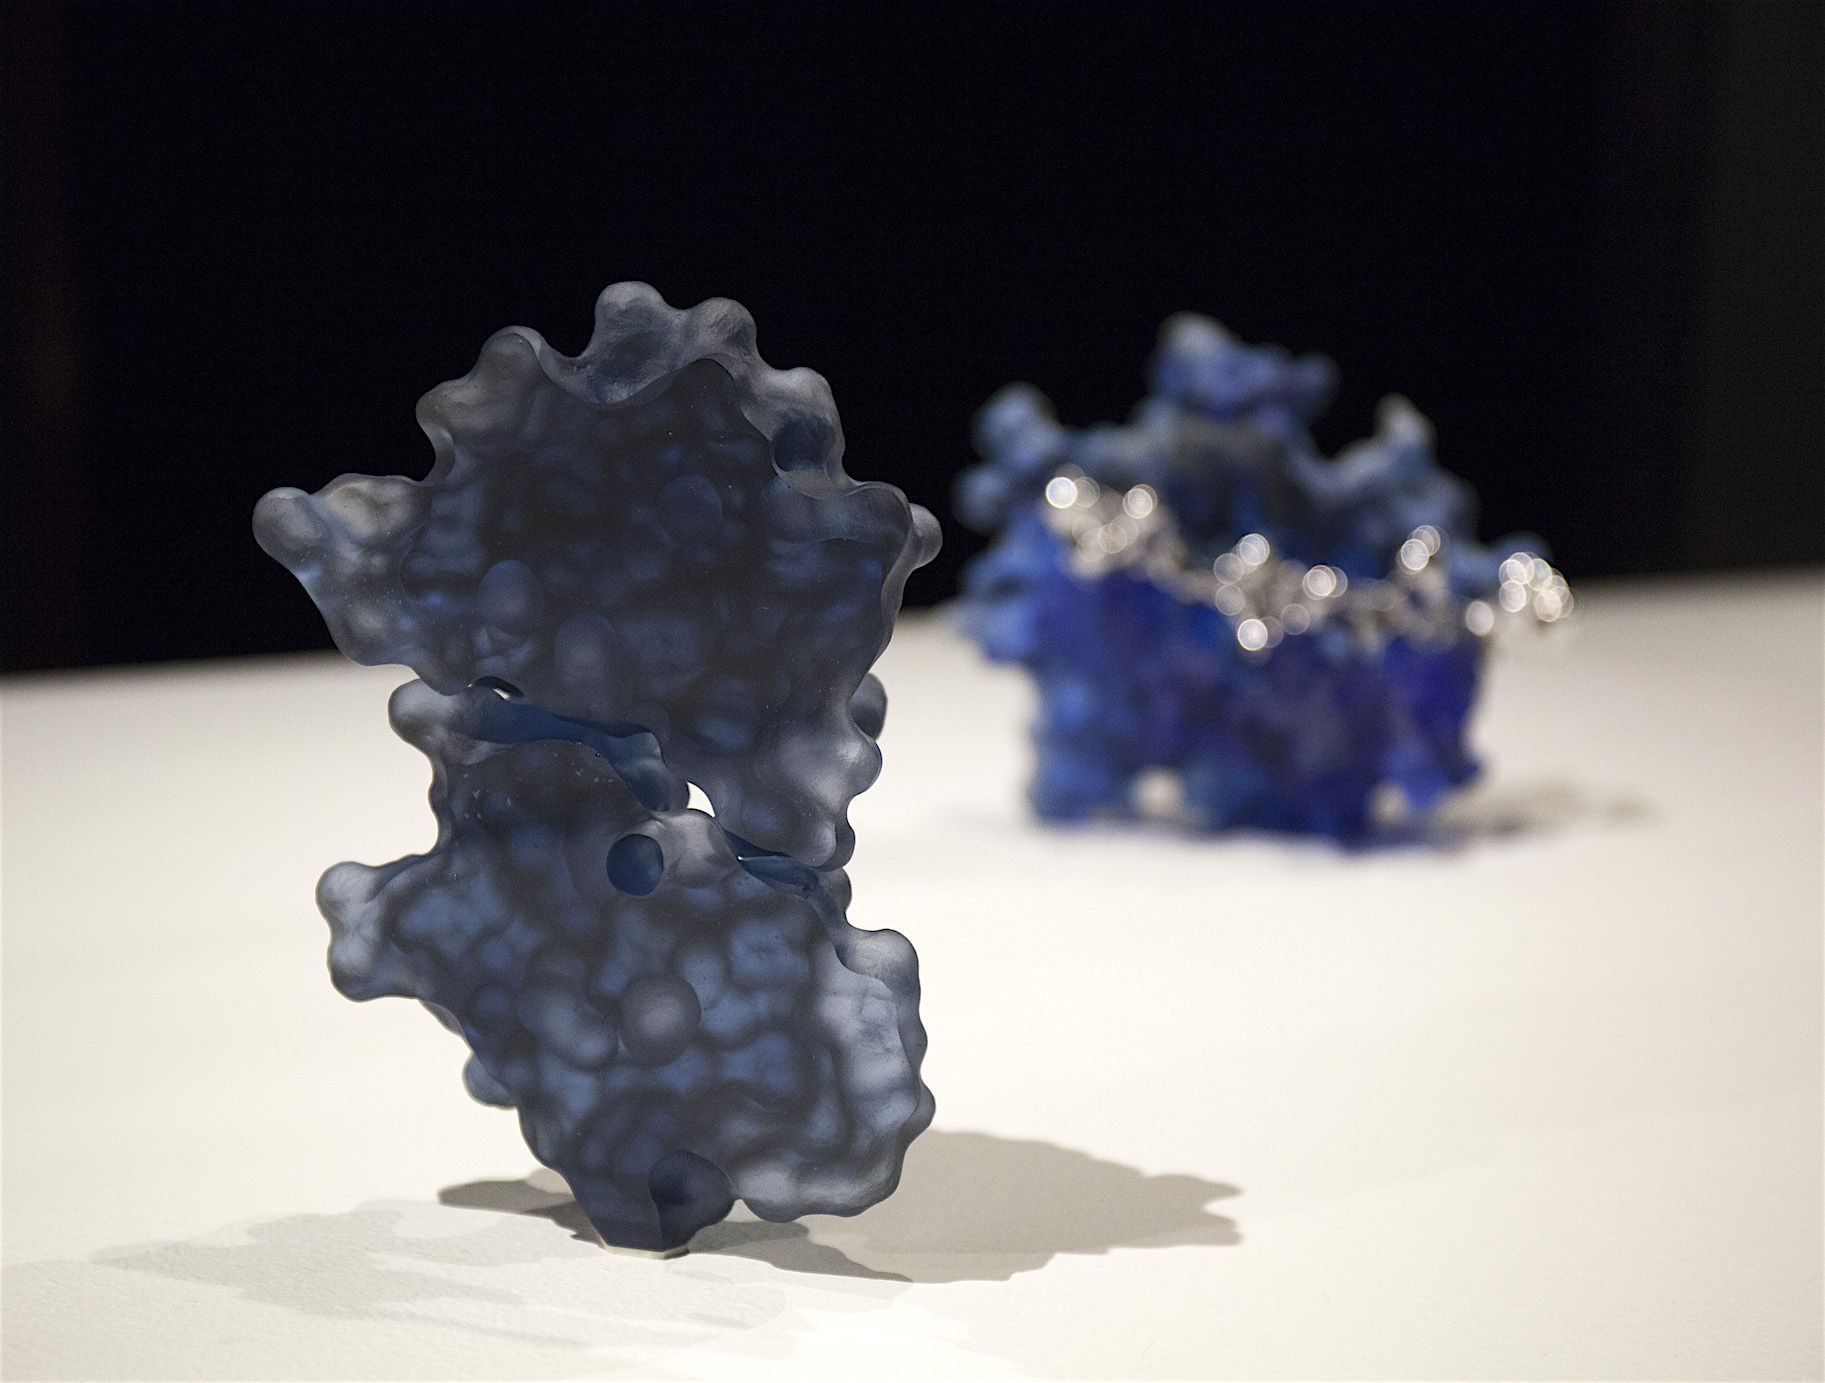
For a few years now I have been experimenting with casting glass and occasionally bronze from 3D printed positive models. Specifically I use this technique to make sculptures of protein molecules rendered as their solvent accessible surface, which are created from their scientifically precise chrystallographic coordinates.
I begin the process of casting a molecular sculpture by reviewing different possible macromolecules for their potential. I often get asked how I choose my models. I have three criteria:
Scientific relevance
- Is it an interesting macromolecule?
- Does it have an important function that is readily explainable and accessible?
- Does it have historical significance in terms of its discovery ?
Artistic relevance
- Do I find it aesthetically pleasing ?
- Is there symmetry in quaternary structure, or a regularity to its fold?
- Does it have a particularly striking shape when rendered volumetrically or through ribbons ?
Practical feasibility
- Is it feasible to cast, process, mount etc. ?
- Is its size prohibitive in terms of equipment I have and time expenditure.
- Does it have structural features that make it unrealistically difficult ?
Once I’ve chosen a candidate I build an initial model using a molecular editor such as RasMol or PyMol. PyMol’s volume function is quite good. MSMS also works. At this stage I think about the final presentation and mounting. Somehow a flat surface is needed or some sort of cradle. It’s good to have some sort of idea even this early of how it’s going to work, even though in practice I often change my mind later as I get to know the piece. For multipart pieces I also assess the fit and do other artistic edits in terms of choosing a conformation for flexible molecules (such as the carbohydrate in the lysozyme piece) which isn’t rigidly determined. There I can manipulate the torsion angles to change the overall shape in a way that makes sense. Finally I calculate a solvent accessible area and save the coordinates and faces as an .stl or .obj file.
These raw models I then load into Blender for further editing. In many cases I will make changes at this stage. First I have to decide on a scale, though in practice all my current work is at the same scale of 4 Angstrom/inch. The mixing of metric and imperial units is a bit funny, but it came from when I was making hand-formed copper models where my raw materials were in imperial units but the units of molecular modeling are Angstrom or nanometers. Somehow this scale worked well for what I was doing and so it has become my standard.

I also prepare the models for printing. Since macromolecules don’t have a flat surface I almost always cut the model into two parts, creating a large surface for each half to be printed on. Choosing the cut plane is critical to minimize the number of overhangs during printing, which usually yield worse surface quality and waste support material. In some cases I use 3 or 4 cut planes, especially when the models get large, here I have to work carefully to take in account the printing volume and balance number of pieces vs printability and overhang avoidance.
I then print each part on a typical PLA extrusion printer. Even though the print is just a throwaway positive I actually print it with a relatively thick skin and a reasonably large amount of fill density. This is for a number of reasons. In post processing, especially smoothing, I found having a thin skin to be problematic. Especially during solvent smoothing the model can collapse or distort if it does not have sufficient internal support. Furthermore a thin skin is more likely to have a small hole that might go undetected. This will later lead to ingress of plaster-slurry which can end up being embedded in the glass (see section below). A thicker skin will be easier to keep watertight. I almost always choose clear PLA, because it burns out the cleanest. Colored PLA (even that “white” variety) has additional additives which do not burn out well. Once all the parts are printed I glue them together, usually using a small amount of superglue first to keep them in a fixed position and then I seal the seam using a soldering iron. Generally I manipulate the PLA using soldering irons which work great when small parts of the model need to be repaired, fused, remove or added. I use a little PLA filament as “solder” if I need to add material. I have a couple of different tips in different shapes which I use like hot spatulas. I use these to smooth out any coarse artifacts on the model. Fine stuff is left for the next step. At this stage I also make sure different models fit together properly and I make any necessary modifications if not.

To get rid of the print lines I’ve tried a number of different techniques, many of which didn’t really work. Obviously getting the highest possible print to start with is paramount. Thinner layer thicknesses are better and make smoothing much easier. Smoothing is important though. The plaster will readily pick up the fine detail of the print lines and those will later be evident int he glass/metal. Now is the easiest time to get rid of them.

Generally these days I start by brushing on some Dichloromethane (DCM, or methylene chloride). This stuff is really very nasty and I do this work either in a fume hood or outside with a fan blowing away from me. I use a respirator with chemical filters, PVA gloves and full eye glasses. Do not use this chemical unless you’ve taken the proper safety precautions! However I found no other solvent even remotely as good at smoothing as Dichloromethane. Apparentl Tetrahydrofuran (THF) is ok, though I’ve not tried it. Acetone is completely useless, as PLA is completely insoluble in Acetone. Due to the nastiness of Dichloromethane I’ve never attempted doing vapor smoothing, but the simple cold brush on works surprisingly great. Sometimes I do two “coats”. With each coat the Dichloromethane dissolves the surface layer of the PLA and the resolidifies, running into the cracks. It also conveniently seals any tiny holes in the print where print layers have failed to fuse properly. Another method is to spray on many coats of a lacquer, e.g. shellac. This has some problems though during burnout and can leave undesirable carbon residues in the mold which can be tricky to remove. With higher burnout temperatures though this has been less of a problem.

One thing to be aware of though is that if you ever intend to make a rubber mold out of a printed positive, do not use Shellac. Shellac has residual alcohol in it and apparently is one of the very very few things that bonds to setting rubber. I found this out the hard way when my mold positive didn’t want to come out of the mold, cracking the rubber. For direct-into-plaster positives it works ok though thick layers have a tendency to char and leave carbon deposits.

When the model is ready and smooth, I attach the sprues and air vents. Depending on whether it is a metal cast or a glass cast these have to be designed differently. Liquid metal has a very low viscosity and runs fast. This means that supply channels can be more narrow but air vents have to be a little wider since the air is getting displaced much faster (almost instantly). Metal will also run up channels so not every part of the model has to have a supply line “from the top” so to speak. Often a single inlet is sufficient. In fact often a better quality is achieved when the cavity is filled from the bottom. Glass on the other hand is a completely different animal. It oozes, slowly, over the course of many hours. Much thicker than honey. This means supply channels want to be relatively wide (or it will take a very long time). Air vents can be very thin since the air has tons of time to escape. Also glass won’t run upwards very much. On the bottom of the model, with sufficiently long melts, I found that the pressure is high enough to force glass upwards perhaps an inch or two at best. Higher Up on the model though it won’t, so each chamber of the model needs at least a small supply sprue. The size is determined by the size of the chamber to be filled, though I often er on the side of caution. Believe me it is a crushing feeling when you open your mold and everything went well except some little part of it didn’t fill.

The other thing I check at this stage is water tightness. The easiest way is just to submerge the entire model in a bucket of water and watch for any bubbles, just like you would with a bicycle tire. If it bubbles, you have a problem. It turns out that when the model is leaky, a little plaster slurry will seep into the internal honeycomb of the printed model. It hardens and when you burn out the plastic will remain in this crumbly but solid lattice shape, while the surrounding plastic evaporates. The remaining plaster will stay behind and end up getting embedded into the glass. Another disappointing thing to find out after everything else worked seamlessly. This is also a great time to estimate the volume of the positive. This will later inform how much glass to place in the kiln, which has to be done relatively accurately.

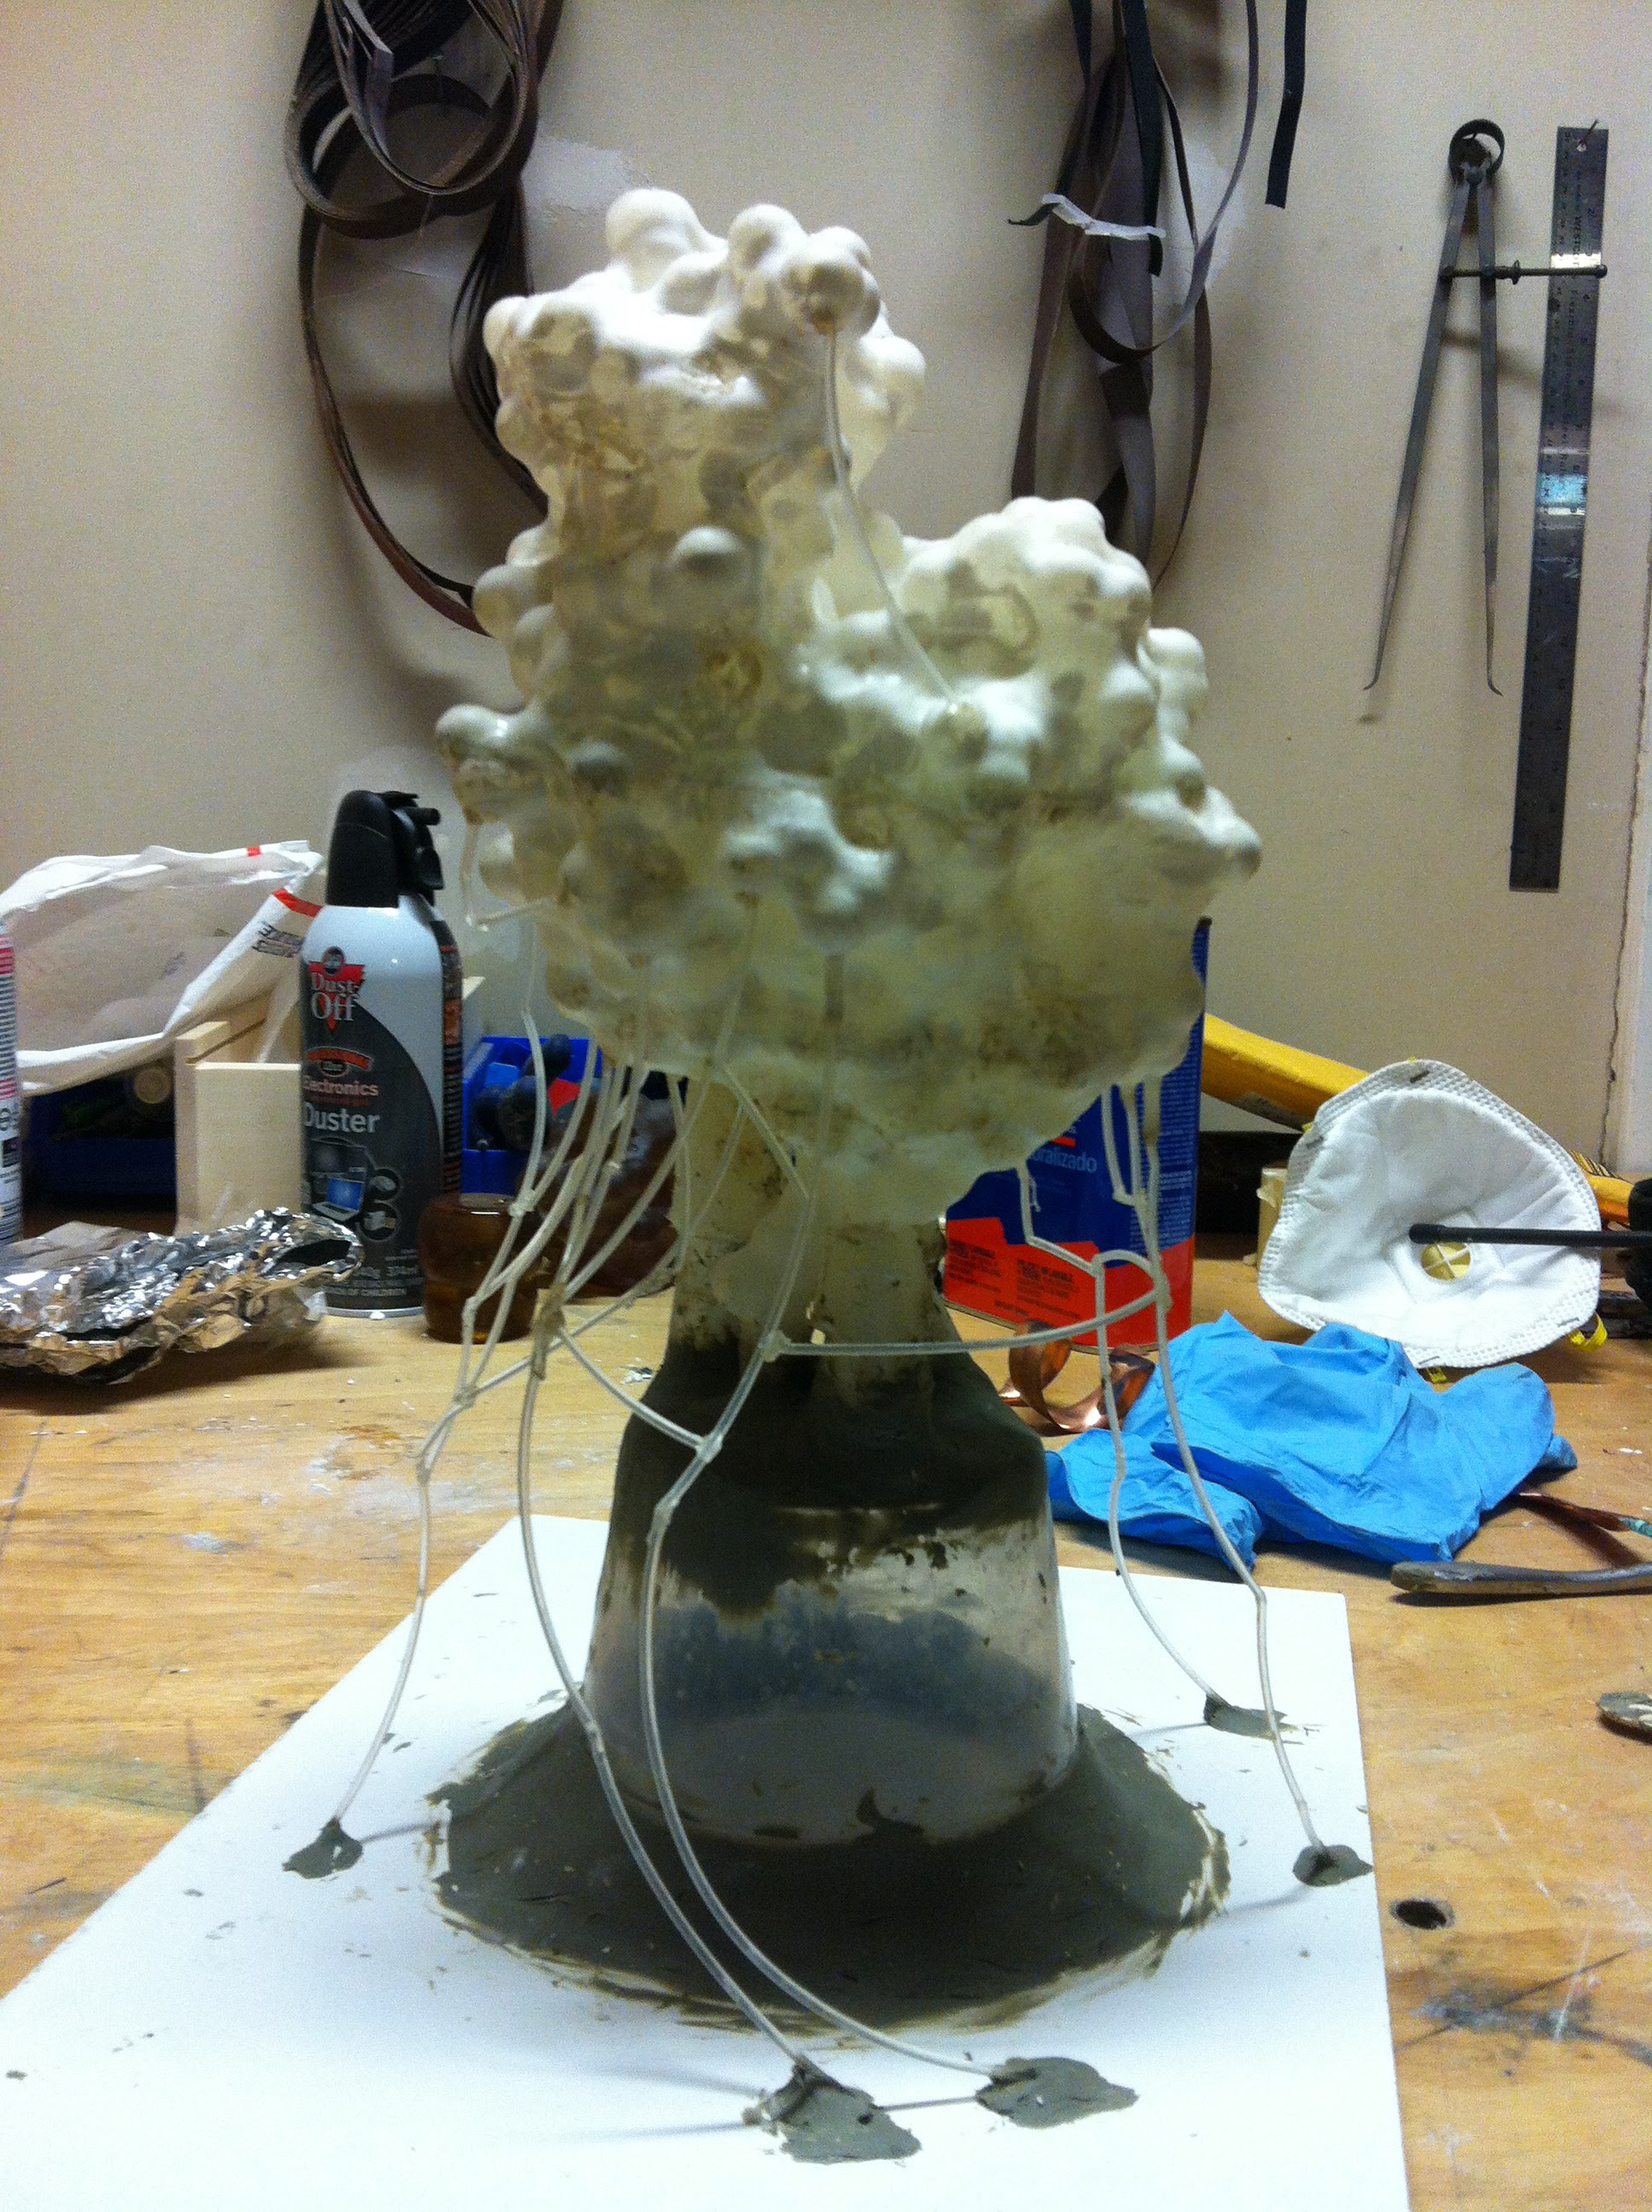
Do make air vents I simply use printer filament. To attach them I use a soldering iron. For glass the air vents don’t need to go to the top of the mold, they can go to the bottom or the side. The glass is too viscous to leave through the air vents. With metal they need to go to the top. Liquid metal can squeeze through tiny holes and channels and you risk a leak. I’ll often connect the air vents into a sort of network both to make it more stable (it’s easy to break it off when handling the model) and to create redundancy. Below is a photo of a fully set up model, ready for pouring of the plaster mix. Note it’s upside down. The inlet, the main sprue, is on the bottom and is connected to a coated wooden board using plasticine or wax.
To make the actual mold I’ve tried two different ways, both work and it sort of depends on gut feeling and the shape of the piece as to which I’ll choose. The first involves building a wall around the piece that’s stuck to the base plate. I often use corrugated plastic to make the barrier. I use wax and/or plasticine to seal the bottom of the wall. Since the piece is upside down, the wall needs to be about 1-2 inches taller than the highest point of the mold such that the mold later has a thick enough bottom. The second way involves taking a suitably sized cardboard box and a plastic bag. I line the inside of the cardboard with the bag, taping it to the side. Later I will fill the “bucket” with plaster and then lower the piece down into it from the top, hanging from the support board. In this case I usually use a long slender support so that I have space to add additional plaster if needed.
Time to pour the plaster mix. For glass casting the mold mix is 1:1:1 silica:plaster:water, by weight. The silica is 200 mesh finely ground silica. It acts as a refractory material, i.e. it helps withstand the heat. The plaster is simple potter’s plaster. I thoroughly mix these at 1:1 as dry powders first. This ensures very thorough mixing later so there aren’t pockets of just plaster or just silica. To mix the plaster you always add the powder mix to a bucket of water. I guesstimate the final amount I need for the mold. You need a little over half the final volume in water. Perhaps 60% or so. Better too much than too little, nothing more annoying than having to mix another batch in a rush. Eyeballing the amount of plaster needed I found fiendishly difficult. Either way, you start with a bucket of water and slowly add the powder mix until a dry island appears at the top of the water surface, which doesn’t sink in anymore. It’s important not to stir during that time. Usually by the time the last of the plaster mix is added there’s a little island in the middle of the bucket surrounded by water. I usually wait a minute and let more of the air escape and the plaster soak through. Then, if it’s a small amount I mix it with my hands or in case of larger amount, I use a drill with a mixer attachment. Avoid whisking in air, this is the opposite of pancake making.

For many molds I will first do a face coat and then finish the mold in second pour. The first coat I pour on, and work into all the details using a brush, ladling it on and on until it becomes thick enough to stick, forming a thickish layer over the positive. This step ensures every crevice is filled and also reduces the amount of surface bubbles since working in the material with your hands or a brush tends to pop any bubbles or promote them rising to the surface. As the plaster hardens I rake in some grooves with my fingers to provide a good interlocking with the second, poured, layer. For most molds I set in some fiberglass around the outside and sometimes additional fiberglass ribbon if the mold is particularly slender. There is nothing worse than a cracked, burst mold with oozing glass emerging spilling in the kiln. I then mix a second batch of plaster and pour it in. Generally I do both layers in one sitting. You don’t want the face coat to dry out and then pour the second one.

Now that the mold is poured, I generally let it air dry for a few days. After the first 24 hrs I take off the box or container that held the plaster, aiding drying. Next, we need to burn out the mold. I place the mold, upside-down, in the kiln, usually on top of a metal grating I’ve built. Underneath I place a metal pan to catch the drippings. The pan is lined with some aluminum foil for easy cleaning. The burnout protocol plateaus at several temperatures. First 230 to dry the mold completely. Then at 500 to drive off all the chemically bound water and start melting the PLA. At the end of this stage the bulk of the PLA will have melted and dripped out into the pan, so I will open the kiln and empty the pan. The program then ascends to 700. At this temperature PLA will evaporate rapidly and carbon deposits will also oxidize away. I noticed that when I didn’t go up to this temperature, some of the molten PLA mould soak into the plaster and then, upon cooling and contraction, cause the plaster to crack. However if the temperature is raised sufficiently, the PLA evaporates completely, thus not creating those stresses during cooling and many cracks are avoided. Some cracks still occur, but the resultant flashing can later be ground off.
| Time (Hr:Min) | Temp(F) | Description |
|---|---|---|
| 2:00 | 230 | Drying wet mold |
| 2:30 (Hold) | 230 | Drying wet mold |
| 3:00 | 500 | Melt PLA without burning it |
| 4:00 (Hold) | 500 | Melt PLA without burning it |
| 2:00 | 700 | Vaporize remaining PLA |
| 4:00 (Hold) | 700 | Vaporize remaining PLA |
| 7:00 | 60 | Cool to room temperature |

At this point the mold is ready for casting. With the opening pointing upwards, the mold is placed in the kiln. I often place fire bricks around the mold just in case it fails the bricks will keep the mold from completely breaking apart and leaking its contents into the kiln. Cleaning off the glass from the shelf and heating elements is a huge pain. Above the mold I place a suitable size flower pot which will hold most of the cold glass.

Using my earlier estimate of the volume I figure out how much glass to put in the flowerpot. Ideally the amount is just right so that at the end of the melt the mold is completely full, with a good amount remaining in the funnel above the mold but virtually none in the flowerpot. Too much glass and it will overflow the mold, waste glass and cause a mess. Also it will shatter during demolding and, if unlucky, will send cracks propagating into the piece. Too little and the piece won’t be filled completely. Either outcome is highly undesirable.

Sometime the geometry of the piece doesn’t allow for all of the necessary glass to be placed in the pot at once. In that case some has to be reserved and added during the melt. My kiln has a special hole at the top to allow this to happen easily. However adding cold glass to a 1500F kiln causes the glass to violently shatter, sometimes spraying bits of it everywhere in the kiln, once again, making a mess (or potentially falling into another mold if multiple pieces are being cast at once). Measuring the volume of glass chunks is easiest done also by adding them to a bucket of clean water and measuring the displacement which can be compared to the displacement of the positive, done earlier.

I often load the glass wet (but not dripping) into the flowerpot - as the kiln warms up there’s plenty of time for it to evaporate. I buy the glass in billets, usually from Gaffer. To get the right amount I use a glass cutter to score the billets and a hammer to crack them (wear safety glasses!). I try and minimize the number of pieces, since the smaller the pieces the more likely they are to trap bubbles as they melt. Bigger bubble-free pieces are best, but sometimes fitting it all into the flowerpot necessitates breaking them up a bit more than ideal.
The next step is figure out the firing protocol. These are given usually by the glass manufacturer (e.g. Gaffer) and depend on the thickness of the thickest part of the model and how thick the mold is. An example profile is below.
| Time (Hr:Min) | Temp(F) | Description |
|---|---|---|
| 3:00 | 300 | Drying wet mold |
| 2:00 (Hold) | 300 | Drive off chemical water |
| 6:00 | 1000 | Heating glass and mold |
| 2:00 (Hold) | 1000 | Time to equalize temperature |
| 10 | 1475 | Bring up to melting temp |
| 8:00 (Hold) | 1475 | Allow glass to flow |
| 2:00 | 890 | Crash temp to solidify piece |
| 10:00 (Hold) | 890 | Hold at Annealing temperature |
| 20:00 | 700 | Slow cooling |
| 20:00 | 300 | … |
| 6:00 | 75 | … |
I usually skip the first two steps if the mold is already dried and burned out. Be sure to check with your glass’ manufacturer about the right protocol, it depends strongly on the type of piece and the glass chemistry.

The melt time depends also on the geometry of the model and how the glass flows. There needs to be enough time for the glass to reach every part of the mold. The thinner parts of the mold are the more time that takes, however it depends also on other factors. The pressure at the bottom of the mold is much larger than at the top so glass will flow faster, generally. There is no hard science here, just experience and guessing. I usually err on the side of longer, just to be sure. However longer also means the mold spends more time at the highest temperature which weakens the plaster and stresses the mold. I also plan to check the kiln 30 minutes or so before the temperature is scheduled to drop again. It is relatively safe to open the kiln, since the glass is molten and can’t suffer thermal cold shock. However you are staring into a 1500F hell hole so protective gloves and a face shield are a must. The infrared radiation is super intense. I always try and place the mold in such a way that I can see if the mold is full even if the door is just slightly cracked to minimize exposure (Though at least on one occasion I had to fix a problem inside the kiln at top temperature and had to reach in with kevlar gloves and manipulate a fallen flowerpot - I don’t recommend it). If after the inspection the mold isn’t full I can extend the melt time and, if required, add more glass. Once the program moves into its annealing phase I try not to open the kiln anymore until the program is completely done. There is literally nothing to be done, the glass is solid anyway and opening it risks cold shock and cracks.

After the cast is completely cold (i usually wait 24hrs after the program’s end) I begin removing the mold material by this point it is quite brittle and it’s easy to break it. If the cast shape is quite convex and thick, I usually just remove the mold dry by gently chiseling (with a wooden chisel) and knock on the plaster until it falls of.

However if the mold is quite fragile or complex it is easy to break the glass at this point. To demold I soak the entire mold in a bucket of water. after a few hours the plaster will fall off almost by itself. I then clean the piece with water.

The next step is cold working. Using a dremel and a diamond bit I grind off the air vents, the sprues and any flashing. Once completed, wash the piece again and then let it dry for sandblasting. The sandblasting evens out the texture between the places the piece has been ground and other spots, giving a smooth even finish. It can also help reduce any print lines that are still visible.

Sandblasting smoothes the glass but leaves a very white, scattering surface. Furthermore any moisture or oils from fingers will reduce light scattering and leave dark prints. To make the glass more translucent again it is then etched using a biflouride salt (like potassium biflouride). It is available in powder form from “His Glassworks” - again this is a quite hazardous substance. I work in a well ventilated environment with safety glasses and rubber gloves. The powder is simply dissolved in water and the glass is placed in the solution for 10 minutes or so. Afterwards i dip the glass in a baking soda solution to neutralize the acid. The etching process leaves a white film behind (likely some insoluble compound of the silica and the acid). This needs to be scrubbed off. On of the easiest ways I found to do this is to use a pressure washer. I place the glass on the lawn outside, on an old towel and direct the pressure washer stream down wards onto the glass. This is quite effective removing the white deposits, even in hard to access crevices and pits. Obviously if the glass is quite thin and fragile using the pressure washer method is dangerous and may crack the glass. In that case using a stiff brush, like a toothbrush makes more sense.
To see more pieces check out my website